
If you’re over 50 and feel your legs aren’t as strong as they used to be, you’re not alone. Many people notice that stairs feel harder, getting out of a chair takes more effort, or longer walks leave their legs feeling tired.
The good news is: you don’t need a gym membership or fancy equipment to start rebuilding strength. With just your bodyweight, a stable chair, and a few minutes most days, you can make a real difference to how your legs feel and function.
I’m Will Harlow, a physiotherapist and over-50s specialist at HT Physio in Farnham. In this article, I’ll share three of my favourite bodyweight exercises for stronger legs. These are the same movements I regularly use with my clients to help them feel steadier, safer, and more confident on their feet.
DISCLAIMER: The information in this post is not a substitute for individualized medical advice and the exercises are not suitable for every person. Please get checked out before you start any new exercise programme.
Why Walking Alone Isn’t Always Enough
Walking is excellent for your health and something I encourage almost everyone to do. It helps your heart, your circulation, and your general fitness.
However, walking on its own doesn’t always provide enough strength stimulus to fully protect key joints like your hips, knees, and ankles. To build proper leg strength, the muscles need to be challenged a little more than they are during normal daily activity.
That’s where targeted strengthening exercises come in. These three movements can usually be done in 5–10 minutes a day, and many people notice improvements in 6–8 weeks when they practise them regularly and safely.
Exercise 1: Slow Sit to Stand
If you could only choose one leg exercise, this would be a strong candidate.
We use the “sit to stand” movement all the time in daily life: getting up from a chair, out of bed, off the toilet, or out of the car. When this movement becomes difficult, life very quickly feels harder and less independent.
The slow sit to stand mainly works two important muscle groups:
- Quadriceps – the muscles at the front of the thighs, which help you straighten your knees when you stand and walk.
- Gluteals (glutes) – the muscles in your buttocks, which help protect your hips and control the alignment of your legs.
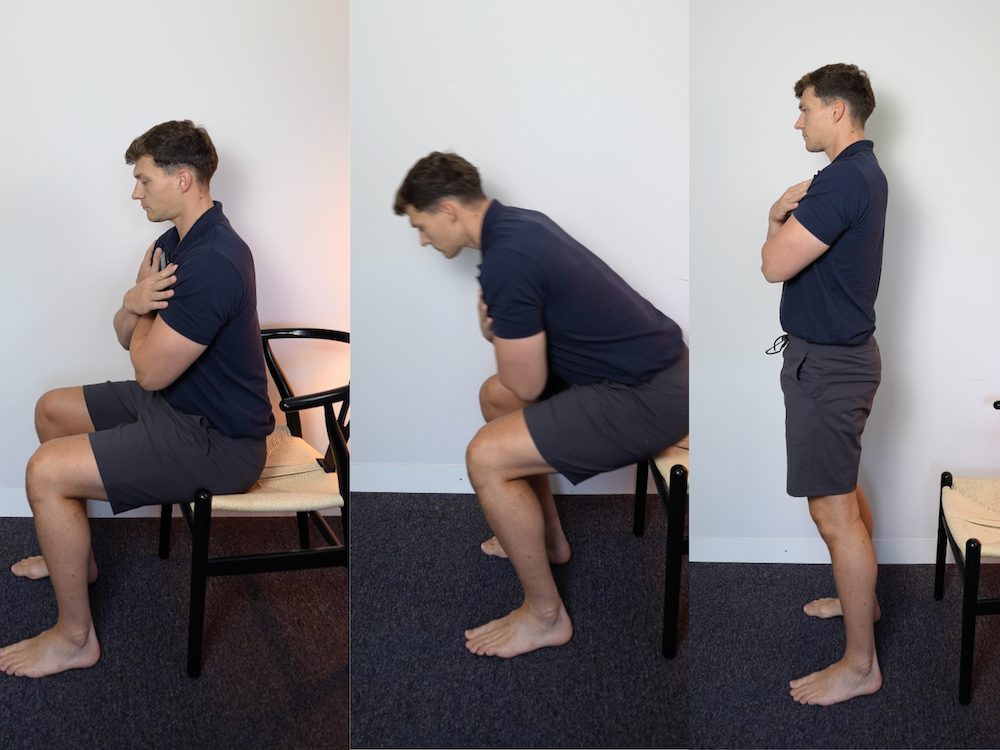
How to do it
- Set up your chair
- Choose a sturdy dining-type chair that won’t slide or tip.
- Sit so that your hips and knees are roughly at 90 degrees.
- Choose a sturdy dining-type chair that won’t slide or tip.
- Arm position
- Cross your arms over your chest if you can, so you’re not pushing off your thighs or the chair.
- If you need your hands for support, you can rest them lightly on your thighs as a starting point.
- Cross your arms over your chest if you can, so you’re not pushing off your thighs or the chair.
- Standing up
- Bring your feet slightly back so they’re underneath your knees.
- Lean your body slightly forwards from the hips.
- Push through your feet and stand up to an upright position.
- Bring your feet slightly back so they’re underneath your knees.
- The important part: sitting down slowly
- Lean forwards slightly again and begin to bend your knees.
- Lower yourself back towards the chair over about four seconds, keeping the movement as smooth and controlled as possible.
- Aim to “land like a feather” — very gently, without a heavy bump.
- Lean forwards slightly again and begin to bend your knees.
You’ll probably start to feel your thighs and glutes working after 3–4 repetitions. As you tire, it becomes harder to control the last few inches of the descent. That’s where a lot of the strength gains happen.
How many should I do?
As a general starting point (if it feels comfortable and safe):
- 5 repetitions
- Rest, then repeat for 3 sets in total.
Over time, you can build up the repetitions or slow the movement down further, as long as it doesn’t cause pain.
Exercise 2: Single Leg Dip
Many people are stronger on one leg than the other without realising it. When both legs work together (as in a standard sit to stand), the stronger side can quietly take over, and the weaker side stays weak.
The single leg dip helps:
- Build strength in each leg individually
- Improve hip and knee control
- Work the glutes harder than a standard two-legged exercise
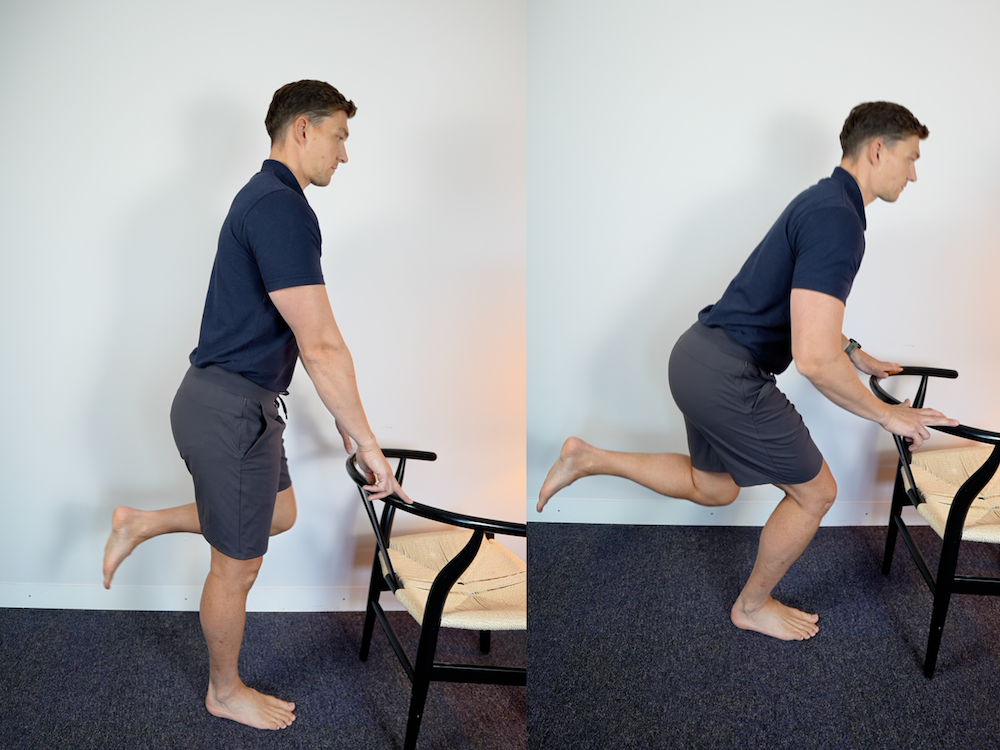
How to do it
- Set up for support
- Stand next to the back of a sturdy chair, kitchen counter, or banister.
- Lightly rest your fingertips on it for balance.
- Stand next to the back of a sturdy chair, kitchen counter, or banister.
- Get into position
- Stand tall and shift your weight onto one leg.
- Let the other foot hover just off the floor.
- Stand tall and shift your weight onto one leg.
- The movement
- Keeping your pelvis level (try not to let one side drop), gently bend the standing knee and lean your body slightly forwards.
- Lower yourself by around 6 inches – it’s a small movement.
- Straighten back up to the starting position.
- Keeping your pelvis level (try not to let one side drop), gently bend the standing knee and lean your body slightly forwards.
You should feel the muscles in the front of the thigh working, along with the glute muscles in the buttock, especially as you keep your pelvis steady.
How many should I do?
If it’s comfortable and feels safe:
- 10–15 repetitions on one leg,
- Then 10–15 on the other leg,
- Rest, and repeat the process for up to 3 sets.
If you find your pelvis dropping or the movement becoming wobbly, reduce the depth slightly or hold on a bit more firmly for support.
Exercise 3: Heel Raises for Calf Strength
The calf muscles (at the back of the lower leg) are crucial for walking. Every time you take a step, your calves contract to help push you forwards. Weak calves can make walking slower, less stable, and more tiring.
Heel raises are a simple and effective way to build calf strength.
How to do it
- Set up for support
- Stand behind a sturdy chair or at a kitchen counter.
- Hold on lightly with your hands for balance.
- Stand behind a sturdy chair or at a kitchen counter.
- Starting position
- Stand tall with your knees straight and your weight evenly spread between both feet.
- Stand tall with your knees straight and your weight evenly spread between both feet.
- The movement
- Rise up onto your tiptoes as high as is comfortable.
- Gently squeeze your calves at the top.
- Pause briefly, then slowly lower your heels back down to the floor.
- Rise up onto your tiptoes as high as is comfortable.
You should feel a gentle ache or tiredness build in the calves as you go – that’s a normal sign the muscles are working.

Making it easier or harder
- Standard version: up and down on both feet together.
- If it feels too easy:
- Go up on two feet, then lift one foot and lower yourself down on just one leg.
- Or, if you’re quite strong and steady, you can work towards going up and down on one leg at a time (only if it feels safe).
- Go up on two feet, then lift one foot and lower yourself down on just one leg.
How many should I do?
As a starting guideline:
- 10–20 heel raises in a row
- Rest, and repeat for up to 3 sets per day (as tolerated)
You’re aiming to feel that the muscles have “worked”, not pushed into sharp or severe pain.
Putting It All Together
These three exercises:
- Slow sit to stand
- Single leg dip
- Heel raises
can form a simple daily routine for building stronger legs over 50.
Many people find that, when done regularly for 6–8 weeks and progressed gradually, they start to notice:
- Easier walking
- Better confidence on stairs
- Less effort getting out of chairs
- A general feeling of being more stable on their feet
Everyone is different, so your experience may vary, but these are common outcomes my clients report when they stick with the routine.
A Few Safety Tips
- Pain: It’s normal to feel muscle effort or mild ache, but stop if you experience sharp, severe, or worsening pain.
- Balance: Always use a chair, counter, or rail for support if you feel unsteady.
- Medical conditions: If you have heart problems, severe arthritis, recent surgery, or any health conditions you’re worried about, check with your GP or physio before starting.
Author:
Will Harlow, MSc, MCSP
Over-50s Specialist Physiotherapist, HT Physio – Farnham, UK.
If you’d like more structured guidance, check out my book Thriving Beyond 50, packed with safe, practical ways to build strength, mobility, and confidence after 50.